2. How to Set Up Payment
To set up payment for a given program, simply click on the Enrollments tab, then click on the Enrollment number or on 'Setup Payment'. This latter option will only show if you are not yet set up for payment under that program.
On the next screen, several options may be available depending on the situation (refer to screenshot below):
Note: You need a payment method to see the payment plan details, as the amount is dependent on the payment method choice
A: Select a payment plan, if an option has been given to you.
B: Breakdown of the invoice(s) that get charged now (if any) versus later - click on either box to show the invoice(s). This section appears only once both a payment plan and a payment method have been selected.
C: this section shows you any invoice due/past due that will be processed immediately; if you want to see the future invoices, press 'Show All [number] Invoices' just below, or click 'Scheduled Payments' in section B.
D: If you have an existing payment method(s) like a credit card set on TUIO, you can select to pay from them here.
E: If you don't have any existing credit card set up on TUIO, or need to add a new one, you can do so on this part of the screen (or scroll down further on this page for the additional steps required to set up a bank account).
F: This section confirms how much will be charged immediately upon set up, if anything.
When you are done reviewing, click Confirm at the bottom to finalize the set up.
The following applies only for parents wanting to pay by bank account; parents paying by credit card can ignore this.
How To Add A Bank Account
Given the widespread use of credit cards for online payments, we make the assumption that parents do not need to be guided step-by-step to add a credit card on TUIO. If you have questions about adding a credit card, you can always email [email protected].
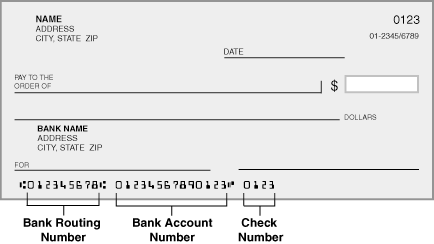
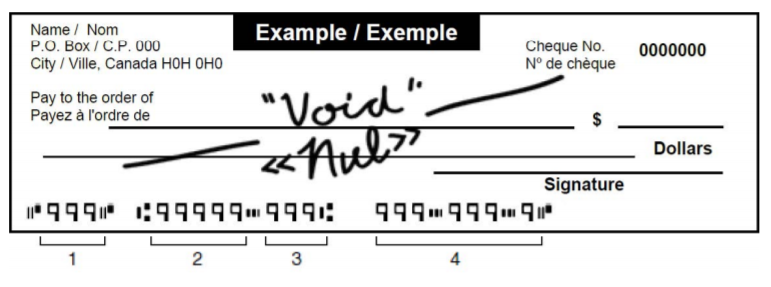
Whether you add a bank account on the payment plan choice page or the 'Payment Methods' tab on the TUIO app, you will be asked to provide the Branch, Institution and Account numbers that can be found on a cheque, as per the image example(s) below. Do not include any dash, space or other symbol; the data entered in the branch, institution and account fields should be digits only. The address should be your home address, not the branch/bank address.
US Void Check

Canadian Void Cheque

1: Cheque number - ignore
2: Branch number - 5 digits
3: Institution number - 3 digits
4: Account number - as shown on cheque
Once you're done, all you need to do is agree to the terms of the pre-authorized debit agreement. If you are on the Programs Summary/confirmation page, don't forget to hit Confirm at the bottom of the page to validate the payment plan/method for the program you were getting set up for.


