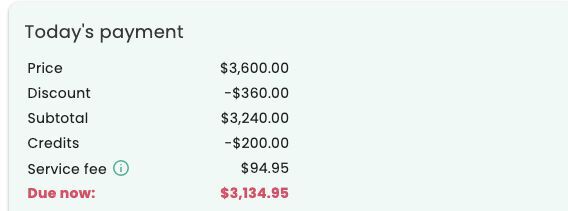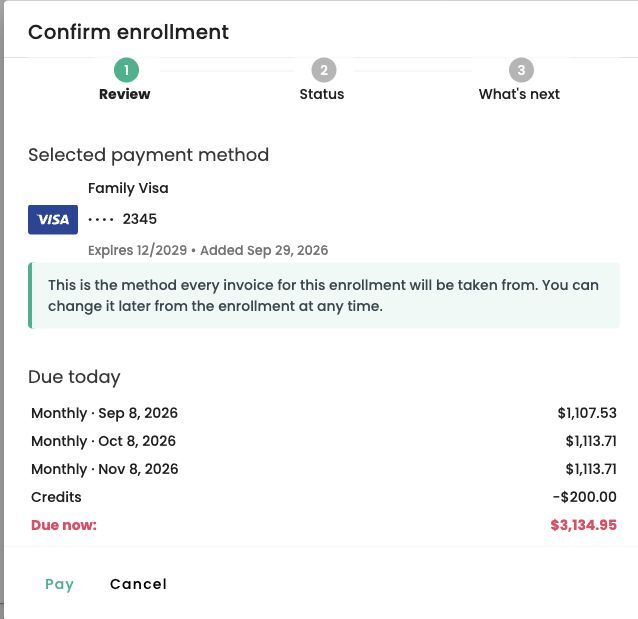
Payment setup connects an enrollment to a payment plan and payment method. Adding a card or bank account alone does not finish the enrollment setup.
Set up an enrollment payment
- Open Enrollments and select the relevant enrollment or Setup payment link.
- Under Select payment plan, review the plan. Use Change if the school has made other plans available.
- Under Set payment method, choose an existing method or use Add new card or Add bank account, when offered.
- Review Today's payment and All invoices. Check the amount due now, future due dates, and any fees before proceeding.
- If shown, select Set as default payment method for enrollments without a payment method only if you want that broader assignment.
- Select Confirm, then review the Confirm enrollment dialog. If a payment is due, check the Credits and Due now amounts before selecting Pay. The final action can start eligible due or overdue payments.
If a payment is already in progress, check its status before attempting another payment. If a method or plan is unavailable, contact your school.
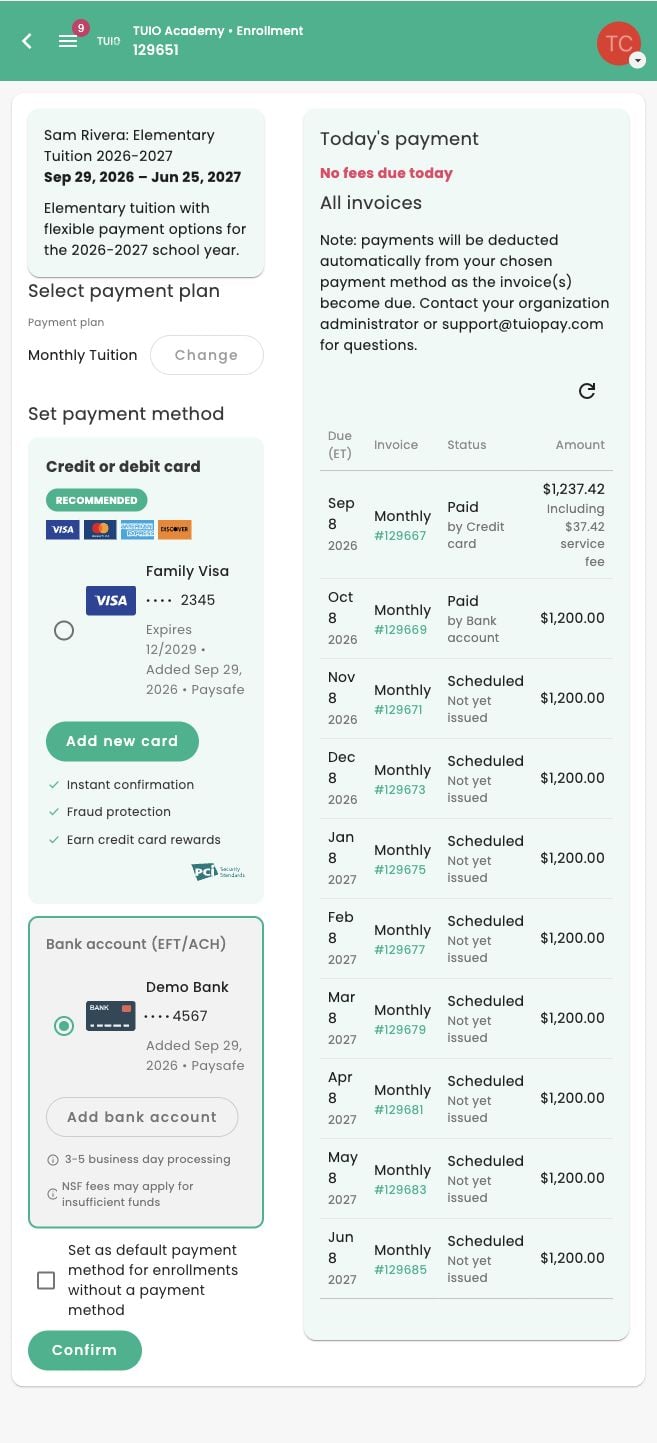
Available payment plans, methods, amounts and fees depend on your enrollment.
Assign payment methods from your saved methods
The full enrollment page and the Assign payment methods dialog have different controls. Follow the steps for the screen you opened, and review the enrollment scope and payment information before confirming or saving.
- Open Payment methods and select Assign payment methods.
- Review the payment method on each enrollment row. A method marked Preselected. Save to confirm. has not yet been assigned. You can select another available method or add a card or bank account from this dialog.
- Check Balance and Due now, then select View breakdown to review Today’s payment and All invoices.
- If a row says No payment plan selected, use Set up to complete that enrollment’s setup.
- Choose Save when the enrollment selections are ready. Saving can start eligible due or overdue payments, so review the payment information first. Choose Cancel to leave the assignments unchanged.
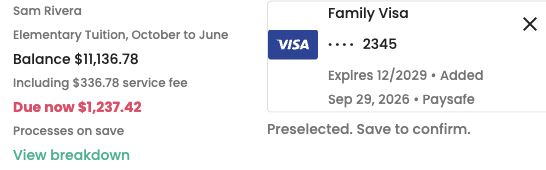
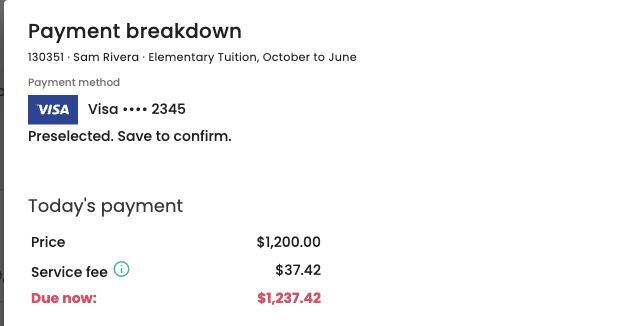
An invoice with a payment already in progress is excluded from the balance shown in this dialog. Check its status before trying to pay it again. If the displayed amount does not match what you expect, contact your school before saving.
How To Add A Bank Account
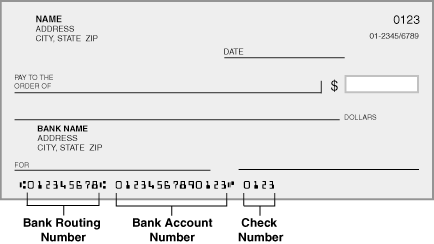
US Void Check
Whether you add a bank account on the payment plan choice page or the 'Payment Methods' tab on the TUIO app, you will be asked to provide the Routing and Account numbers that can be found on a check, as per the image example(s) below.
- Do not include any dash, space or other symbol; the data entered in the routing and account numbers should be digits only.
- The address should be your home address that's registered with the bank, not the branch/bank address.
- Enter the routing and account numbers exactly as provided by your bank for electronic payments, including any leading zeros supplied by the bank. If TUIO does not accept them, confirm the details with your bank or contact TUIO support. Do not add zeros just to make a number fit.
Canadian Void Cheque
Whether you add a bank account on the payment plan choice page or the 'Payment Methods' tab on the TUIO app, you will be asked to provide the Branch, Institution and Account numbers that can be found on a cheque, as per the image example(s) below.
- Do not include any dash, space or other symbol; the data entered in the branch, institution and account fields should be digits only.
- The address should be your home address that's registered with the bank, not the branch/bank address.
- Enter the account number exactly as provided by your bank for electronic payments, including any leading zeros supplied by the bank. If TUIO does not accept it, confirm the details with your bank or contact TUIO support. Do not add zeros just to make a number fit.
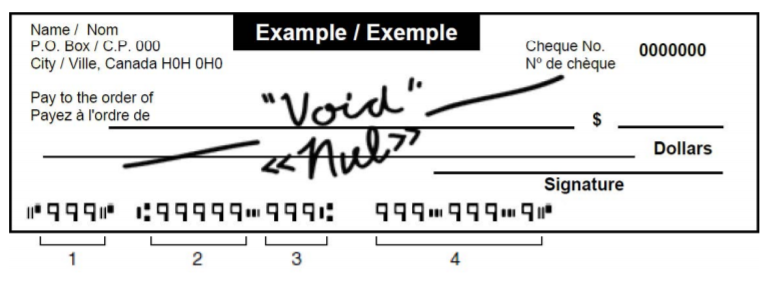
1: Cheque number - ignore
2: Branch number - 5 digits
3: Institution number - 3 digits
4: Account number - as shown on cheque
Enter the Account holder name as registered with the bank. Read the linked terms and select I agree to the pre-authorized debit terms before saving the bank account. Opening the terms link does not select the checkbox.
If you are setting up an enrollment, review the payment plan, payment method and amount due now, then select Confirm to finish. Saving a method alone does not complete enrollment payment setup. Confirmation can start eligible due or overdue payments, so review the amount shown first.
Paying a specific invoice
To make a payment on an individual invoice, see How to pay an invoice with Pay now. Check whether a payment is already processing before trying again. Choosing a method for future enrollment payments is separate from paying that invoice.
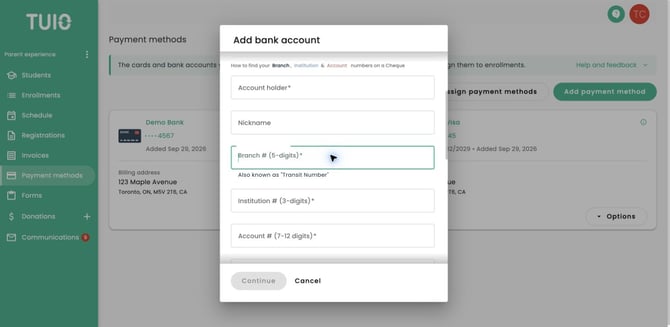
Canadian bank account fields
The screenshot shows the Canadian account-holder, branch/transit, institution and account-number fields. Scroll within the dialog to complete the remaining account and address details and review the pre-authorized debit terms. Use the numbers supplied by your bank.
US bank account fields
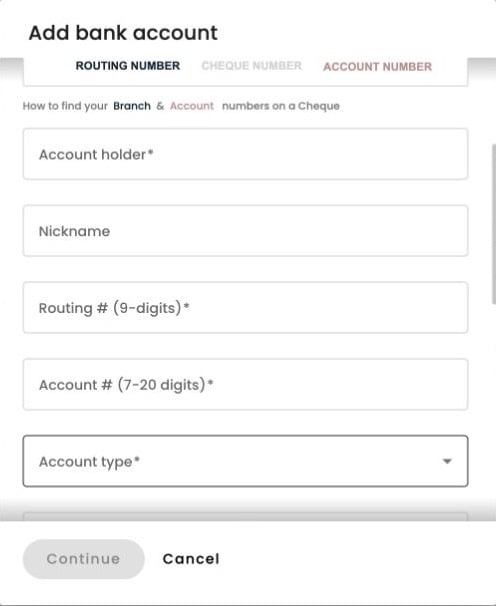
Enter the account holder, routing number and account number supplied by your bank, then choose the account type. Scroll within the dialog to complete your address and review the pre-authorized debit terms.
Enter the billing address for a new payment method
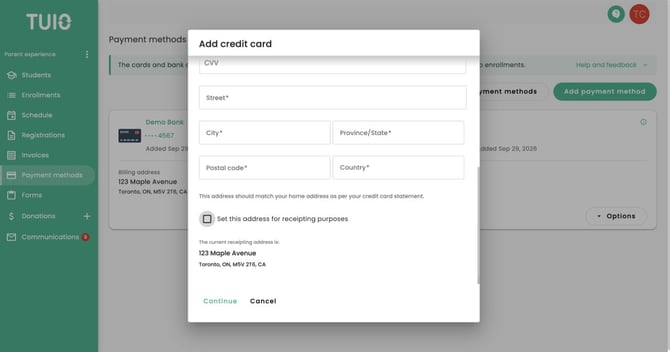
The billing address starts empty when you add a payment method. Enter the address held by your bank or card issuer, even if you already saved an address in your TUIO account.
If Set this address for receipting purposes is offered, review its selection. It is selected by default only when your account does not already have a street address. Use it when you also want this address used for receipting.
Review account credit before confirming a plan
When you select a payment plan, Due now and the amount described as being processed today take eligible account credit into account. Where credit applies, the warning explains how much it pays toward today's amount, and Confirm enrollment includes a Credits row.
Open the Today's payment breakdown to review the credit and the remaining payment, even when credit covers the full amount. Review the displayed total before confirming. Contact your school if the available credit or remaining amount is not what you expect.